Live-Scripting
Table of Contents
- 1. Introduction
- 2. Installation on lubuntu
- 3. Creating a Static Website
- 4. Adding Search to the web
- 5. Sharing Options
- 6. Miscellaneous
1 Introduction
This is the project page of the life-scripting project : http://live-scripting.s3-website.eu-central-1.amazonaws.com/orgweb/live-scripting/live-scripting.html
It is created using the live-scripting approach.
This project is managed on GitHub: https://github.com/andreaswittmann/live-scripting
The project owner is Andreas Wittmann IT-Beratung GmbH: http://www.andreaswittmann.de
1.1 Functional Areas
Live-scripting is an approach to combine work in IT projects, documentation and information retrieval.
Very much like test-driven development combines testing and coding, live-scripting documents work in command shells, while doing it.
But live-scripting is much more than that. It encompasses five functional areas as depicted in the following figure.
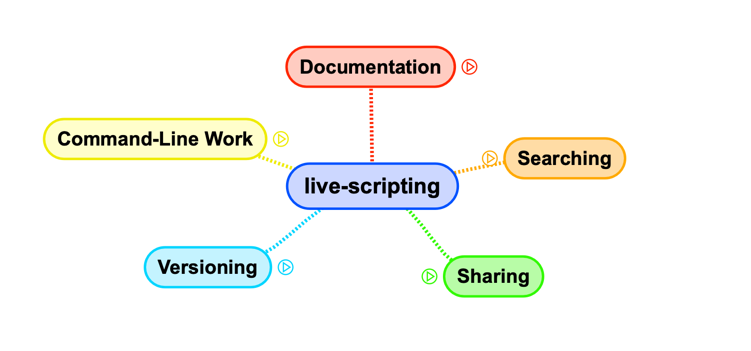
Figure 1: Functional Areas of live-scripting
While working with live-scripting, a lot of documentation can be created easily in a short amount of time. In order for this information to be usable, live-scripting includes various search capabilities. Sharing of information is vital for any project. Live-scripting offers different sharing options. Since the basis of live-scripting documentation is ASCII text, versioning with source code control systems is very effective and supported by this approach.
1.2 The Problem
Since more than 30 years and even now, IT-work in many case is command shell centric. For many IT professionals the bash or other shells constitute a major part of their work. Sophisticated commands are constructed during problem resolution. Normally, these commands are deleted at the end of a session. When similar problems arise days or weeks later, similar analysis and solution steps are repeated again. If documentation of the work is required, it is an extra time consuming task. We wish to document this work in an easy way for ourselves and others. This should include an effective search method to quickly find the documented information.
1.3 The live-scripting approach
Live-scripting is a work methodology based on emacs, which documents work on the command shell while doing it. Instead of entering and executing one command at a time, in live-scripting we use two windows side by side: an editor and a shell. The commands in the editor can then be executed with a single key shortcut in the adjacent shell. This is similar to a debugging session where we can step through code during execution. In the Emacs editor we can jump between commands, repeat them in any order, duplicate and modify them. The editor can be saved into an ascii file at the end of the session.
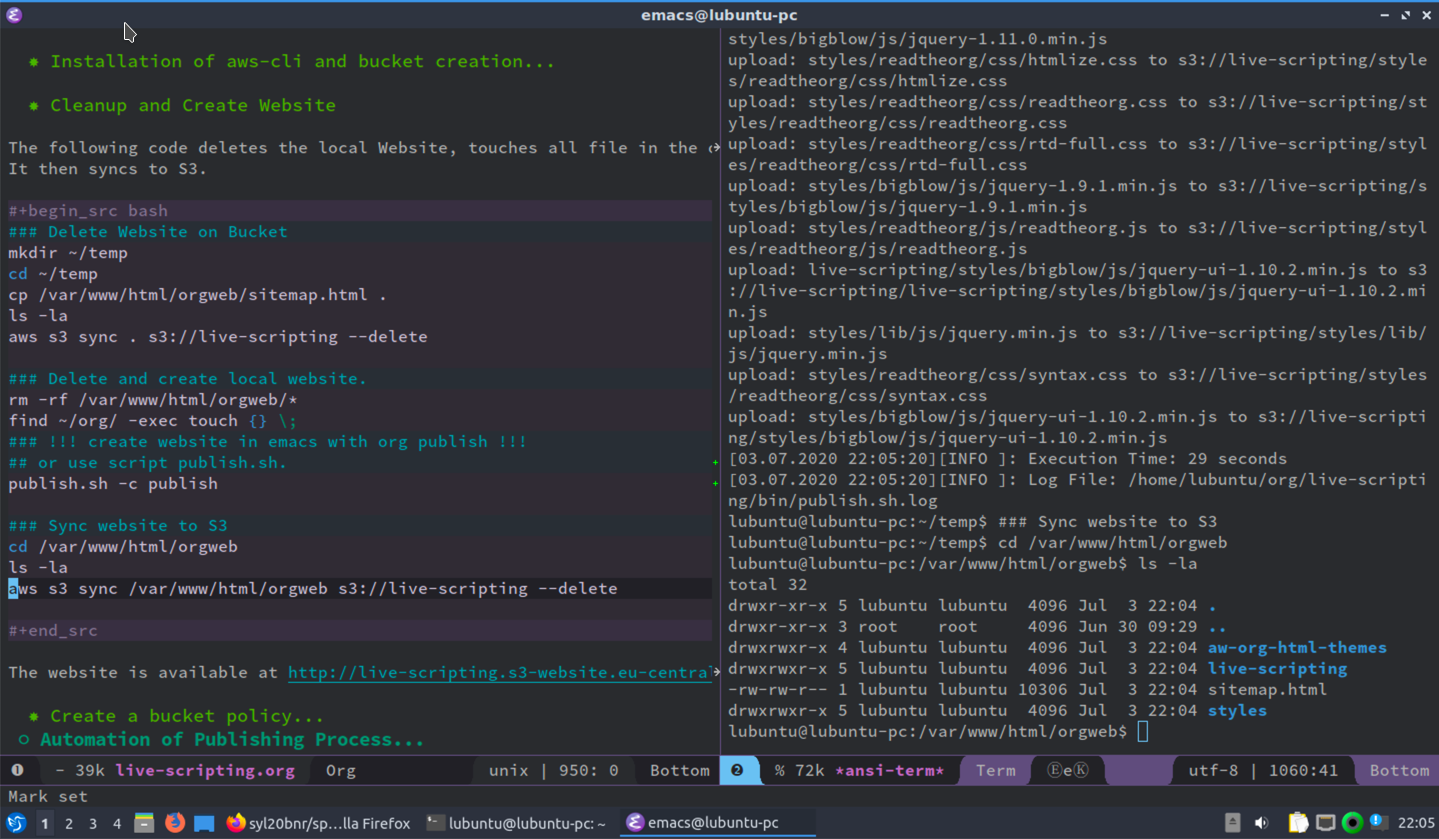
Figure 2: Live-Scripting Session in Emacs.
1.4 Emacs and Org-mode
Emacs is the ideal tool for this approach. The ansi-term provides for a robust shell interface within emacs. Since it is an programmable environment, the functions to send a line of code to the ansi-term can be implemented. Furthermore the org-mode module is an Emacs killer app on its own, adding many features to organize, format and publish the work. At it's core, org-mode is a mark-up language similar to markdown, but much more powerful. Emacs provides elaborated search capabilities across files and projects. The magit module is a highly praised interface to git. The fact that most files are plain text, invites the storage in a source code control system like git. But org-mode can also handle pictures to add screenshots and attachments for file types like PDFs and others. Org-mode together with a couple of other Emacs modules constitute a cross-media publishing machine which makes it easy to export to HTML, PDF, Markdown, Confluence, and more.
1.5 Multi Project Website
Live-scripting, as it is presented here, is a configuration that spans multiple projects and publishes the org-files and attachments to a single static website which I call orgweb. This can be used locally or be synchronized to a web server in an intranet or on the internet. The web site contains a search pages for the whole site based on lunr, which provides a full text search index for finding information across different pages and projects.
1.6 Technologies
Live-scripting makes intensive use of open source technologies, as depicted in the following mind map.

Figure 3: Technologies used by live-scripting
The live script, which in many situations is the basis in this approach, is edited in Emacs, preferably using the org-mode module of Emacs. The shell commands are executed in the Emacs Ansi-term module, which is a terminal emulator written in lisp. The work is documented in an Emacs Orgmode file which is a powerful markup language. Images, Screenshots and other file attachments can be integrated via drag and drop. Using the Emacs org-publish module, a local static website is created, which uses a beautiful CSS style sheet, featuring a responsive design and easy navigation. For information retrieval the excellent Emacs search capabilities are used. The website uses a search function provided by Luna, which is an open source full-text search engine written in java script. For sharing a across the internet, the local website can be synchronized to a web server or to an Amazon S3 based website. The whole website can also be packed as an HTML archive. Individual org-mode files can be exported to PDF, formatted ASCII text, markdown and more. versioning is done using git which is perfectly supported by the Emacs Magit module. The git projects can be pushed to an online repository like GitHub or others. The Emacs Projectile module supports the multi-project approach of live-scripting.
2 Installation on lubuntu
The installation is performed on Lubuntu, an Ubuntu based Linux distribution. Lubunut is lightweight and therefore suitable for virtual machines and cloud environments. But this is not a restriction. Live-scripting can also be used on other Linux distributions, MacOS and even on Windows systems.
2.1 Prerequisites
A Linux installation with a graphical interface and a GNU Emacs installation is required to use live-scripting.
In this example we use Lubuntu 19.10 and GNU Emacs 26.3.
sudo sed -i -e 's|disco|eoan|g' /etc/apt/sources.list
sudo apt update
sudo apt upgrade

### New Release
lubuntu@lubuntu-pc:~$ lsb_release -a
No LSB modules are available.
Distributor ID: Ubuntu
Description:    Ubuntu 19.10
Release:        19.10
Codename:       eoan


### Install emacs
lubuntu@lubuntu-pc:~$ sudo snap install emacs --classic
2020-06-19T09:39:50+02:00 INFO Waiting for restart...
emacs 26.3 from Alex Murray (alexmurray) installed

### Clone project live-scripting
mkdir org; cd org
git clone https://github.com/andreaswittmann/live-scripting.git
This creates the prerequisites for live-scripting.
2.2 Basic Live-Scripting
In the simplest configuration, the GNU Emacs installation is adapted to execute shell commands from an orgmode file.
I use the init.el from the live-scripting project, which contains the configuration for basic live-scripting
### Copy init.el to emacs
cp ~/org/live-scripting/init.el ~/.emacs.d/

### Restart emacs
I can now open two windows side by side in Emacs. In the right window I execute an ansi-term.
In the left window I execute shell commands from an orgmode file.
| M-x 3 | Open two windows |
| C-x o | other-window |
| M-x ansi-term | Open ansi-term |
| C-x 0 | other-window |
| F5 | Send command and step one line further. |
Now shell commands can be executed directly. The code block here is only for formatting purposes.
### example execution of shell commands with live-scripting

ls -la
date
whoami
pwd
2.3 Spacemacs configuration
Configuring Emacs is very time consuming. With the Spacemacs project I get an extensively configured and up-do-date Emacs.
2.3.1 Installation
I clone Spacemacs from GitHub. Before doing so, I backup the destination directory so that it is not overwritten. The old init.el is no longer used.
### move emacs directory, to save it
mv ~/.emacs.d ~/_emacs.d
mkdir ~/.emacs.d
cd ~/.emacs.d
ls -la
### Install spacemacs
git clone https://github.com/syl20bnr/spacemacs ~/.emacs.d
Now, I restart Emacs. The Spacemacs start dialog follows.
I choose the following options:
- Editing Style: emacs
- Distribution: standard
- Completion Framework: helmet
I edit the file ~/.spacemacs to use the following layers:
;; List of configuration layers to load.
dotspacemacs-configuration-layers
'(
  ;; ----------------------------------------------------------------
  ;; Example of useful layers you may want to use right away.
  ;; Uncomment some layer names and press <SPC f e R> (Vim style) or
  ;; <M-m f e R> (Emacs style) to install them.
  ;; ----------------------------------------------------------------
  helm
  auto-completion
  ;; better-defaults
  emacs-lisp
  git
  markdown
  org
  (shell :variables
         shell-default-height 30
         shell-default-position 'bottom)
  spell-checking
  ;; syntax-checking
  version-control
  themes-megapack
  )
;; List of additional packages that will be installed without being
;; wrapped in a layer. If you need some configuration for these
;; packages, then consider creating a layer. You can also put the
;; configuration in `dotspacemacs/user-config'.
dotspacemacs-additional-packages
'(
  minimap
  sr-speedbar
  ;;;; Org
  org-beautify-theme

 )
Emacs has to be restarted several times until it initializes without errors.
I want the .spacemacs file to become part of the project. I link it from the user's home directory.
cd ~
mv .spacemacs org/live-scripting/
ln -s ~/org/live-scripting/.spacemacs ~/.spacecmacs
Ok.
2.3.2 Configuring the Default Theme.
To configure the default theme, I edit the variable dotspacemacs-themes in the .spacemacs file.
;; List of themes, the first of the list is loaded when spacemacs starts.
;; Press <SPC> T n to cycle to the next theme in the list (works great
;; with 2 themes variants, one dark and one light)
dotspacemacs-themes '(leuven
                      tangotango
                      spacemacs-dark
                      spacemacs-light)
Ok.
2.3.3 Send to ansi-term
The old inti.el file was replaced by the .spacemacs file. I have to make necessary changes here to be able to control the ansi-term.
For this purpose the function dotspacemacs/user-config is extended.
;;;; Send region and line to ansi-term
;; https://emacs.stackexchange.com/questions/28122/how-to-execute-shell-command-from-editor-window/28126#28126
(defun send-region-to-ansi ()
  "If region active, send it to ansi-term buffer."
  (interactive)
  (if (region-active-p)
      (send-region "*ansi-term*" (region-beginning) (region-end))))

;; Meine Erweiterung um Lines zu senden
(defun my-select-current-line ()
  "Selects the current line, including the NEXT-LINE char at the end"
  (interactive)
  (move-beginning-of-line nil)
  (set-mark-command nil)
  (move-end-of-line 2)
  (move-beginning-of-line nil)
  (setq deactivate-mark nil))

(defun send-line-to-ansi ()
  "If region active, send it to ansi-term buffer."
  (interactive)
  (my-select-current-line)
  (if (region-active-p)
      (send-region "*ansi-term*" (region-beginning) (region-end)))
   (deactivate-mark 1))

;; das funktioniert sehr gut. Binden auf F8
(global-set-key [f5] 'send-line-to-ansi)
(global-set-key [f6] 'send-region-to-ansi)
(global-set-key [f7] 'other-window)
(global-set-key (kbd "C-n") 'other-window)

;; In ansi-term toggle between char run/line run mode.
;;http://joelmccracken.github.io/entries/switching-between-term-mode-and-line-mode-in-emacs-term/
(defun jnm/term-toggle-mode ()
  "Toggles term between line mode and char mode"
  (interactive)
  (if (term-in-line-mode)
      (term-char-mode)
    (term-line-mode)))
(global-set-key [f8] 'jnm/term-toggle-mode)


  ;; Moving Lines, from http://emacsredux.com/blog/2013/04/02/move-current-line-up-or-down/
  ;; Transpose function for lines
  (defun move-line-up ()
    "Move up the current line."
    (interactive)
    (transpose-lines 1)
    (forward-line -2)
    (indent-according-to-mode))

  (defun move-line-down ()
    "Move down the current line."
    (interactive)
    (forward-line 1)
    (transpose-lines 1)
    (forward-line -1)
    (indent-according-to-mode))

  ;; Diese Kürzel kollidieren nicht mit org-mode
  (define-key input-decode-map "\e[1;5A" [C-up])
  (define-key input-decode-map "\e[1;5B" [C-down])
  (global-set-key [(C-up)] 'move-line-up)
  (global-set-key [(C-down)] 'move-line-down)
Now commands can be executed directly in an ansi-term using function keys.
| F5 | send line to ansi-term |
| F6 | send region to ansi-term |
| F7 | othe window (C-x o) |
| F8 | toggle char run/line run mode |
Here is a small test.
ls -la
pwd
whoami
date
Ok.
2.3.4 Configuring Flyspell.
Flyspell already works. I want to switch the dictionary to German.
For this purpose it must be installed first. In Ubuntu this is done via the package manager.
But I would rather use hunspell and install it together with the dictionary.
Hints for dictionaries can be found at Ubuntu: https://wiki.ubuntuusers.de/Rechtschreibkorrektur/#Woerterb%C3%BCcher
### load aspell Dictionary
sudo apt-get install aspell-en

### Install Hunspell.
sudo apt-get install hunspell
sudo apt-get install hunspell-en
sudo apt-get install hunspell-en-en-frami

which hunspell # /usr/bin/hunspell
| M-x ispell-change-dictionray | select german. |
| M-x customize-variablebe ispell-dictionary | Select sting and enter english. |
| M-x customize-variablebe ispell-program-name | entry: /usr/bin/hunspell |
Test: Which program is used?
The entry is in the message buffer:
Starting new Ispell process /usr/bin/hunspell with deutsch dictionary...
Saving file /home/lubuntu/org/live-scripting/.spacemacs...
2.3.5 Magit Authentication
I want to be able to push from Magit to Github without having to enter the password again.
This can be done with SSH keys in three steps.
- create SSH key pair.
- Create ssh config file.
- register public key in GitHub.
### Check for keys.
cd ~
ls -la .ssh


### Generate key
mkdir .ssh
cd ~/.ssh
ssh-keygen -t rsa -b 4096 -C "lubuntu.mac@live-scripting.de"
id_rsa_github


# Empty Passpharse 2x RET
ls -la
## create config file
cat << EOF > ~/.ssh/config
Host github.com
  IdentitiesOnly yes
  IdentityFile ~/.ssh/id_rsa_github
EOF
 cat  ~/.ssh/config

### Copy the public Key to github via web gui
cat ~/.ssh/id_rsa_github.pub

### Prepare projects
cat ~/.ssh/id_rsa_github.pub
cd ~/org/live-scripting
git remote set-url origin ssh://git@github.com/andreaswittmann/live-scripting
git remote -v

cd ~/org/aw-org-html-themes
git remote set-url origin ssh://git@github.com/andreaswittmann/aw-org-html-themes
git remote -v
git push

cd /var/www/html/orgweb/
git remote -v
git remote set-url origin ssh://git@github.com/andreaswittmann/orgweb

### Check git operations
git pull -v
git push -v
The following figure shows how to add the public key to the GitHub project in order to access it with SSH.
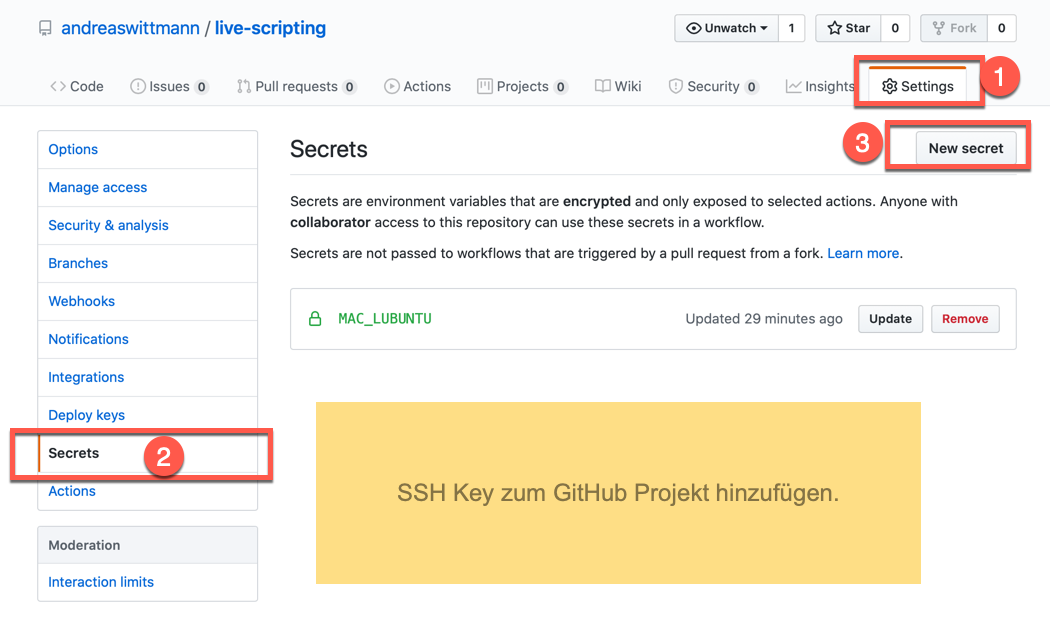
Figure 4: Add public key to GitHub project.
2.3.6 Configuration of org-download
Org-download is an Emacs package which allows to add images to an org file by drag and drop.
GitHub: https://github.com/abo-abo/org-download
Org-Download offers two methods for saving the attachements. I use the image directory.
For this purpose the variable org-download-method has to be adapted via customization.
2.3.7 Install Adobe Font Source Code Pro
This is the default font for Spacemacs.
There is a manual available at: https://gist.github.com/enzinier/8d00d3f37d2e23985dcfa65662d163fa
#!/bin/sh
# Userland mode (~$USER/), (~/).

# ~/.fonts is now deprecated and that
#FONT_HOME=~/.fonts
# ~/.local/share/fonts should be used instead
cd
FONT_HOME=~/.local/share/fonts

echo "installing fonts at $PWD to $FONT_HOME"
#mkdir -p "$FONT_HOME/adobe-fonts/source-code-pro"
find "$FONT_HOME" -iname '*.ttf' -exec echo '{}' \;

(git clone \
   --branch release \
   --depth 1 \
   'https://github.com/adobe-fonts/source-code-pro.git' \
   "$FONT_HOME/adobe-fonts/source-code-pro" && \
fc-cache -f -v "$FONT_HOME/adobe-fonts/source-code-pro")

### Die Fonts liegen jetzt unter ~/.local/share/fonts/adobe-fonts/source-code-pro
To check which fonts are actually used, I enter: M-x describe-font
The default font is too small for me. Therefore I change it to 15pt. This is configured in .spacemacs using the dotspacemacs-default-font variable.
;; Default font, or prioritized list of fonts. `powerline-scale' allows to
;; quickly tweak the mode-line size to make separators look not too crappy.
dotspacemacs-default-font '("Source Code Pro"
                            :size 15
                            :weight normal
                            :width normal
                            :powerline-scale 1.1)
2.3.8 Set up SpeedKeys.
There is a module called org-speed-commands, sometimes also called speedkeys, which can be used to navigate an org-structure much faster.
To use it, the variable org-use-speed-commands must be set to non-nil via M-x customize-variable.
Weblinks:
- Stack Exchange
- key bindings - how to use org-mode speed commands (speed keys)? - Emacs Stack Exchange
- Blog scratch
- Org Speed Keys | scratch
Display Speed Commands Key Binings:
Cursor on first star of an org heading + ?
3 Creating a Static Website
In this chapter I want to create a static website from the org-mode files. I use the org-publish feature which converts org-files to html. Initially I publish to a local web server and then sync the site to the internet.
3.1 Folder Structures and Scopes
Currently I only have one project which is live-scripting. But eventually I want to have multiple projects that will be published altogether. These needs to be considered when setting up the folder structure. Let's have a look at the folder structure and scopes as it is depicted in the following image.

Under the org folder, I can have multiple projects in separate folders that can be managed by git. This constitutes the individual project scope. Regardless of the project scope, I can open the files of all projects in Emacs and register the org files in the org agenda file list. I am thus able to use the orgmode search across all agenda files, which constitutes the orgmode search scope. When I publish the project to a web server I want all projects to be part of a single web, e.g. the orgweb. I will generate a full text search index and a sitemap across all html files of the web. This constitutes the web scope.
But to begin with, I start with a single project website, still keeping in mind the above considerations. The resulting folder structure is illustrated in the following picture.
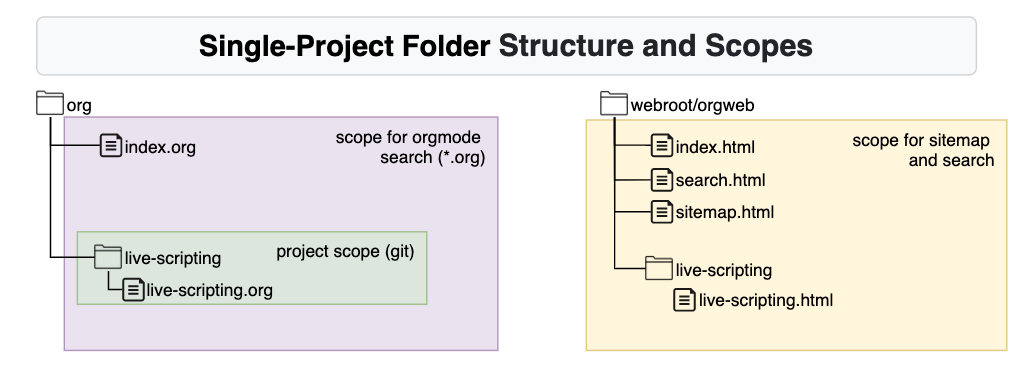
Figure 5: Folder Sctructure and Scopes for a Single-Project Setup.
Now instead of choosing the live-scripting as root for the website, I have one indirection level more. While this is not necessary for a single project setup, it greatly helps to extend to a multi-project setup later.
3.2 Architecture of the website
The following diagram shows the target architecture for the live-scripting project in the context of the static websites which it produces.
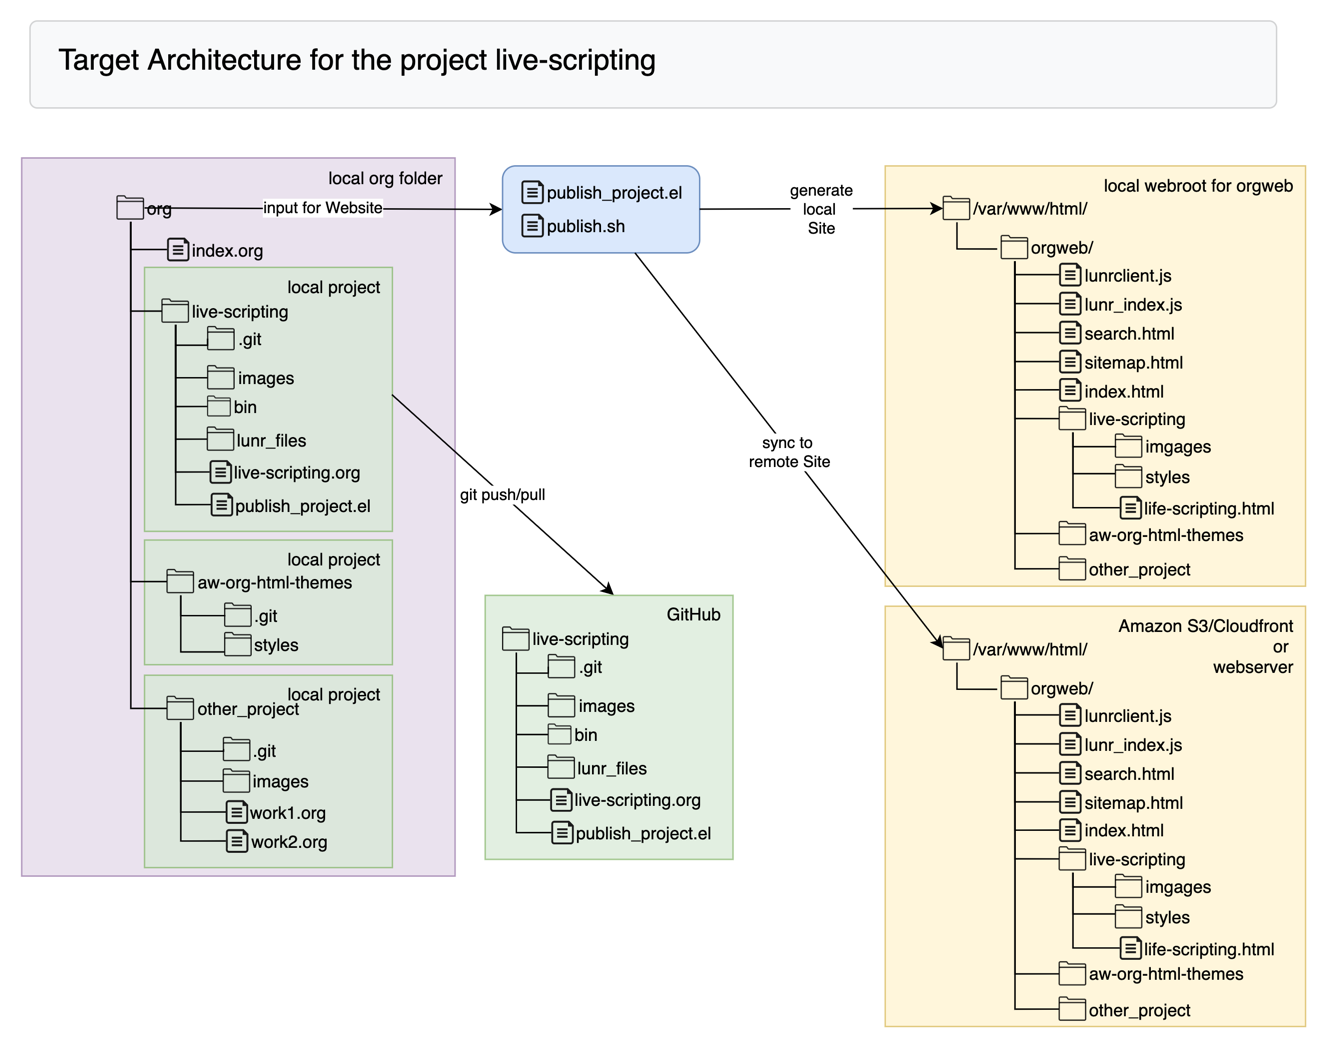
Figure 6: Target Architecture for the project live-scripting
In the purple colored box on the right side, there is the org folder which is the place for the project live-scripting and all other projects on the local machine, which are managed here. Besides live-scripting, there is the project aw-org-html-themes which contains the CSS style sheets. There may be any number of other projects. Tthese projects are local, but may be pushed to a remote git server, e.g. GitHub, which is the case for the live-scripting project. The org folder is the starting point for the generation of the static website. This is done with the script publish.sh which, in turn, uses the configuration stored in publish_project.el. This script implements the production of a static website. In a first step a local website is generated, including all html files, linked images and attachments, a sitemap, and a lunr full text search index. This website is full functional on the local machine. In a second step, the local website is mirrored to Amazon S3 or any other web server. This makes it available on the internet or an intranet.
3.3 Creating local website.
I would like to create a website from the project that runs on a local web server.
It is a static website that can later be replicated on a web server on the internet.
3.3.1 Installation of nginx
I use the nginx web server, there is an installation package of Ubuntu.
There is a manual at: nginx on ubuntu
### Install nginx
sudo apt-get update
sudo apt-get install nginx
Y
## start nginx
sudo  /etc/init.d/nginx start
sudo  /etc/init.d/nginx status
sudo  /etc/init.d/nginx stop

## show web root
ls -la /var/www/html/index.nginx-debian.html

## setup a simple website:
sudo mkdir -p /var/www/html/simple
sudo mkdir -p /var/www/html/simple
cd  /var/www/html/simple
ls -la
sudo chown  lubuntu .
cat << EOF > /var/www/html/simple/index.html
<html>
<body>
<h1>Welcome to simple Web!</h1>
<p>If you see this page, Simple Web ist running.</p>

</body>
</html>
EOF

cat index.html

### get local ip address in lan
ip a  #http://10.211.55.8/
URL for testing: http://localhost/
URL for testing: http://localhost/index.nginx-debian.html
URL for testing: http://localhost/simple/index.html
URL on the LAN: http://10.211.55.8/
Okay.
3.3.2 Setting up org-publish
Org-publish can be used to create a website.
First of all I create the directory for the webroot and assign permissions to be able to work as user lubuntu.
### Clean up
sudo rm -rf   /var/www/html/orgweb/
sudo rm -rf   /var/www/html/
#*******
### create directoy for project live-scripting
sudo mkdir -p   /var/www/html/orgweb
### nginx worker and lubuntu must  have access
sudo chown lubuntu  /var/www/html/orgweb/

cd  /var/www/html/orgweb
ls -la

### Force regenerating the project
rm -r  /var/www/html/orgweb/*
ls -la  /var/www/html/orgweb
find  /var/www/html/orgweb
cd ~/org/
find . -exec touch {} \;
Now I need the configuration in an alist variable. This configuration describes the publishing process.
;; Eval with C-x C-e at end of line
;; Publisch with M-x org-publish-project RET org RET

(require 'ox-publish)
(setq org-publish-project-alist
      '(

       ;; ... add all the components here (see below)...
       ("org" :components ("org-notes" "org-static"))

       ("org-notes"
        :base-directory "~/org/live-scripting/"
        :base-extension "org"
        :publishing-directory "/var/www/html/orgweb/live-scripting"
        ;;:exclude ".*"
        ;;:include ["foobar.org"]
        :recursive t
        :publishing-function org-html-publish-to-html
        :headline-levels 4             ; Just the default for this project.
        :auto-preamble t
        :auto-sitemap t                ; Generate sitemap.org automagically...
        :sitemap-filename "sitemap.org"  ; ... call it sitemap.org (it's the default)...
        :sitemap-title "Sitemap"         ; ... with title 'Sitemap'.
        )

       ("org-static"
        :base-directory "~/org/live-scripting/"
        :base-extension "css\\|js\\|png\\|jpg\\|jpeg\\|gif\\|pdf\\|txt\\|mp3\\|ogg\\|swf"
        :exclude ".git\\|LICENSE"
        :publishing-directory "/var/www/html/orgweb/live-scripting/"
        :recursive t
        :publishing-function org-publish-attachment
        )
      ))
The Publish process is called with : M-x org-publish-project
Then in the next step one of the projects configured in alist can be selected.
This will produce the site with the html page:
http://localhost/orgweb/live-scripting/live-scripting.html
Test URL: http://localhost/orgweb/live-scripting/sitemap.html
Test URL: http://localhost/orgweb/live-scripting/live-scripting.html
3.3.3 Load configuration for org-publish from external file.
I want to save the configuration to an external file and load it on Emacs startup.
To do this I create the file publish-project.el and load it into .spacemacs:
;; Load the configuration for org-publish
(load-file "~/org/live-scripting/publish-project.el")
Okay.
3.3.4 Attachments and images
File attachments and images can be dragged and dropped directly into the org file. The module org-download then takes care that these files are embedded and stored in the folder images. Images are displayed inline, a link is generated for files other and images.
These files are also copied by org-publish to the website.
Example of an embedded image:
(setq org-image-actual-width nil)

Figure 7: Embedded image file
Beispiel für eine eingebettete PDF Datei:
images/Installation_unter_lubuntu/2020-06-24_11-15-55_orgcard.pdf
3.3.5 Problem: Some images are not displayed.
Some images are not displayed in the generated website.
3.3.5.1 Analysis
There are files under the web root that belong to the user lubuntu and have no read permission for others. The nginx worker process belongs to www-data and cannot read these files.
These are some image files I dragged and dropped from Firefox to org-mode.
3.3.5.2 Solution
I search these files and set the permissions.
Afterwards the website must be regenerated with org-publish.
### Handle Permissions.
cd ~/org/live-scripting
## Find files that don't have read permission for others.
find images -user lubuntu \! -perm -o+r  -type f -exec ls -l {} \;
find images -user lubuntu \! -perm -o+r  -type f -exec touch {} \;
## Add read permission for other
find images -user lubuntu \! -perm -o+r  -type f -exec chmod o+r {} \;
3.3.6 HTML Style Readtheorg
There is a very good CSS based style sheet framework for org files.
See: https://github.com/fniessen/org-html-themes
I want to use the ReadTheOrg theme and install it locally.
### Clean update
cd
rm -rf ~/org/org-html-themes
### Clone the Project
cd org
git clone https://github.com/fniessen/org-html-themes.git
find~/org/org-html-themes
###
To use the themes, the directory styles must be copied to the website.
For this I extend the configuration in publish-project.el
("org-themes"
 :base directory "~/org/org-html-themes/styles"
 :base-extension "css\\|js\\|png\\|jpg\\|jpeg\\|gif\\|pdf\\|txt\\|mp3\\|ogg\\|swf"
 :exclude ".git\\\|LICENSE"
 :publishing-directory "/var/www/html/live-scripting/styles"
 :recursive t
 :publishing-function org-publish-attachment
 )
The theme is applied by the following directive SETUPFILE at the beginning of the org file:
#+SETUPFILE: ~/org/org-html-themes/setup/theme-readtheorg-local.setup
#+Options: \n:t
#+Title: live-scripting
With calling org-publish the style-sheet is now used in this file.
3.4 Multi-Project Website
I want to create a website that spans multiple git projects.
This website will be created and updated with a single command. It uses the recursive feature org org-publish.
It is implemented in publish-project.el in the orgweb definition.
3.4.1 Creating the fork of org-html-themes
I have used the GitHub project org-html-themes for applying style sheets to my local website. Now I want to fork this project. I can then make local modifications to the themes. I also want to integrate it into my local website.
I use the GitHub GUI on the web to fork and rename the project to aw-org-html-themes: https://github.com/andreaswittmann/aw-org-html-themes
I make a local clone of the project.
### Clean update
cd
rm -rf ~/org/aw-org-html-themes
### Clone the Project
cd org
git clone https://github.com/andreaswittmann/aw-org-html-themes.git
find ~/org/aw-org-html-themes
###
3.4.2 Using styles of the forked project.
Now I want to use my fork aw-org-html-themes. I have to change the directive SETUPFILE in all org-files and the base-directory path for the component orgweb-themes in publish-project.el.
#+SETUPFILE: ~/org/aw-org-html-themes/setup/theme-readtheorg-local.setup
#+Options: \n:t
#+Title: live-scripting
3.4.3 Problem: the folder "style" is not found by the html files.
The publish process does not respect the folder structure. It expects a style folder on the same directory level. The solution must take into account the option to replicate the static website to a server on the internet.
I write the emacs-lisp function "fixStyleFolder". It is called by :completion-function. It gets the projectPropertyList as an argument. This list contains the publishingDirectory. The function will call the shell script fixStyleFolder.sh that which creates symbolic links in all sub folders.
;; Example for projectPropertyList
(:base-directory ~/org/aw-org-html-themes/styles :base-extension css\|js\|png\|jpg\|jpeg\|gif\|pdf\|txt\|mp3\|ogg\|swf :exclude .git\|LICENSE :publishing-directory /var/www/html/orgweb/styles :completion-function myFunction :recursive t :publishing-function org-publish-attachment)
The emacs-lisp function fixStyleFolder is contained in the file publish-project.sh.
The shell script is located at ~/org/live-scripting/bin/fixStyleFolder.sh
3.4.4 Updating the orgweb site
The orgweb site can be updated with org-publish.
| Emacs Command | Description |
|---|---|
| M-x org-publish-project RET orgweb RET | Create or Update all components of orgweb. |
Cleaning up and recreating everything.
### Force regenerating the project
## Delete Webroot
rm -r  /var/www/html/orgweb/*
ls -la  /var/www/html/orgweb
## touch all org files.
cd ~/org/
find . -exec touch {} \;

## use org-publish-project to recreate all.
## check
find  /var/www/html/orgweb/
This recreates the website with all attachments.
3.5 Publish to github pages.
(Don't do it! Read the conclusion)
I want to publish the static website orgweb to github pages.
There are different approaches explained on: https://help.github.com/en/github/working-with-github-pages
3.5.1 Publish to docs folder
I create docs directory and copy the site there. Then I commit and push it with magit.
### Creating a link.
cd ~/org/live-scripting

rm -rf  ~/org/live-scripting/docs
mkdir -p  ~/org/live-scripting/docs
cd ~/org/live-scripting/docs
cp -r /var/www/html/orgweb/* .
ls -la
find .

## create index.html from sitmap.html
cp sitemap.html index.html

## remove all symlinks, they are external and break github pages.
cd ~/org/live-scripting/docs
find . -type l
find . -type l -exec rm {} \;

## create symlinks manually
cd ~/org/live-scripting/docs/live-scripting
ls -la
ln -s ../styles styles
Ok, this works.
The site is online at: https://andreaswittmann.github.io/live-scripting/sitemap.html
The site is online at: https://andreaswittmann.github.io/live-scripting/live-scripting/live-scripting.html
The style sheet is loaded. The PDF attachments are available as well.
Summary:
It is possible to publish the project to the docs folder in Github, thus demonstrating the capability of org-publish to create a static web site, including style sheets and attachments. However there are some aspects that I don't like. First, since this is a multi-project website, the publish site shouldn't really be inside the project live-scripting but be a project on it's own. Second, I don't like the idea of copying the project from the publish site to the docs directory, thus duplicating all files. This was necessary because git doesn't follow symbolic link.
3.5.2 Publish to a project
In this approach the published website becomes it's own GitHub project.
3.5.2.1 Activities
There are the following activities:
[X]Create new GitHub Project orgweb.[X]Clone orgweb to local publish site.[X]Insert public key on GitHub to push without password[X]Use org-publish to create the project.[X]Use Magit to publish site to GitHub[ ]Write script to automatically commit on push on every org-publish[X]Update FixStyleFolder to use relative links.
That's it.
3.5.2.2 GitHub Project orgweb.
### Clean up and clone Website.
sudo rm -rf /var/www/html/orgweb/
cd /var/www/html/
ls -la

sudo git clone https://github.com/andreaswittmann/orgweb.git
sudo chown -R lubuntu:lubuntu  /var/www/html/orgweb/
cd /var/www/html/orgweb/

### Fix symbolic links
find . -type l

## one level
cd /var/www/html/orgweb/./styles/
cd /var/www/html/orgweb/./live-scripting/
rm styles
ln -s ../styles styles
ls -la
ls styles

## two levels
cd /var/www/html/orgweb/./aw-org-html-themes/demo/
cd /var/www/html/orgweb/./aw-org-html-themes/styles/
cd /var/www/html/orgweb/./live-scripting/moreorg/
rm styles
ln -s ../../styles styles
ls -la
ls styles

## three levels
cd /var/www/html/orgweb/./aw-org-html-themes/styles/readtheorg
rm styles
ln -s ../../../styles styles
ls -la
The site can be found at: https://andreaswittmann.github.io/orgweb/sitemap.html
An update of the site includes three steps:
- org-publish orgweb
- magit or git: add and commit files in project orgweb
- git push project orgweb.
- Troubleshooting
After pushing the project orgweb, GitHub starts a jykell Process to publish the site.
This my lead to an error, send via email. Unfortunately the message very often is just useless like this.
There are no additional information.
Error: The page build failed for the `master` branch with the following error:
3.5.2.3 Rebuilding the website.
These are the steps to rebuild the website completely
cd /var/www/html/orgweb/
## find all generated files and remove them, exclude .git
find . -maxdepth 1  ! -name .git ! -name README.md
find . -maxdepth 1  ! -name .git ! -name README.md -exec rm -rf {} \;
ll

## removing files
git add .
git status
git commit -m "Resetting project"
git push

# touch all file to qualify for regenerating the web
cd ~/org
ll
find . ! -name sitemap.org  -exec touch {} \;
### regenerate web in emacs with org-publish-project orgweb
3.5.3 Conclusion
While it looks tempting to publish to github pages I have to advice against it.
I managed to publish the website orgweb several times but also often ran into errors.
The information provided to resolve the errors is not sufficient. This results in frustrating and time consuming analysis sessions. It is a waste of time.
The Pages feature in github up to now is not mature enough to be used in real world projects!
Other publishing options like web servers or Amazon S3 will be explored.
3.6 Publish to Amazon S3
Amazon S3 is a storage service that includes basic webserver capabilities. It can host static websites, but doesn't not allow for https and authentication. This is fine for this project.
3.6.1 Installation of aws-cli and bucket creation
I need the the command line client from aws to access s3 buckets. I want to install aws-cli version 2.
I follow instructions from https://docs.aws.amazon.com/de_de/cli/latest/userguide/install-cliv2-linux.html
mkdir ~/Downloads/aws-cli
cd ~/Downloads/aws-cli
ls -la
## we need curl
sudo apt install curl

## install aws-cli
curl "https://awscli.amazonaws.com/awscli-exe-linux-x86_64.zip" -o "awscliv2.zip"
unzip awscliv2.zip
sudo ./aws/install

aws --version
# aws-cli/2.0.27 Python/3.7.3 Linux/5.3.0-61-generic botocore/2.0.0dev31

### install profile and credentials for aws
cat ~/.aws/config
cat ~/.aws/credentials

### Test s3 access
export AWS_PROFILE=anwi-gmbh
aws s3 ls

### Creating a buckets, prepare website hosting on aws gui in the browser
aws s3 mb s3://live-scripting
aws s3 ls s3://live-scripting --recursive
#aws s3 rm s3://live-scripting --recursive
Ok, now access s3 via the aws cli works.
3.6.2 Cleanup and Create Website
The following code deletes the local Website, touches all file in the org folder and recreates the local website.
It then syncs to S3.
### Delete Website on Bucket
mkdir ~/temp
cd ~/temp
cp /var/www/html/orgweb/sitemap.html .
ls -la
aws s3 sync . s3://live-scripting --delete

### Delete and create local website.
rm -rf /var/www/html/orgweb/*
find ~/org/ -exec touch {} \;
### !!! create website in emacs with org publish !!!
## or use script publish.sh.
publish.sh -c publish

### Sync website to S3
cd /var/www/html/orgweb
ls -la
aws s3 sync /var/www/html/orgweb s3://live-scripting/orgweb --delete
The website is available at http://live-scripting.s3-website.eu-central-1.amazonaws.com/sitemap.html
3.6.3 Create a bucket policy
The bucket has to be made available for public access. I follow the aws instructions: https://docs.aws.amazon.com/de_de/AmazonS3/latest/dev/WebsiteAccessPermissionsReqd.html
I use the aws management console.
During the process I create the following bucket policy.
{
    "Version": "2012-10-17",
    "Statement": [
        {
            "Sid": "PublicReadGetObject",
            "Effect": "Allow",
            "Principal": "*",
            "Action": [
                "s3:GetObject"
            ],
            "Resource": [
                "arn:aws:s3:::live-scripting/*"
            ]
        }
    ]
}
Ok, this gives public access to the website.
3.6.3.1 Troubleshooting symlinks.
Problem: on the second run of fixStyleFolder.sh the link /var/www/html/orgweb/styles/styles is created but shouldn't
Analysis: This happens only on the second run of the script.
It also happens in subsequent identical calls to ln
I don't know why this happens.
Solution: Instead of using symlinks I replicate the styles folder using rsync.
On the one hand this approach produces redundant files. On the other, it works stable and allows to use the same solution for local and remote websites.
## run script
##-----------------------------------------------------------------------------------------------
 ~/org/live-scripting/bin/fixStyleFolder.sh -c mycopy -d /var/www/html/orgweb/styles -L DEBUG
 ~/org/live-scripting/bin/fixStyleFolder.sh -c mycopy -d /var/www/html/orgweb/styles
cp -R ~/org/aw-org-html-themes/styles /var/www/html/orgweb

## test rsync
export WEB_ROOT=/var/www/html/orgweb
export SOURCE_DIR=/var/www/html/orgweb/styles
#export TARGET_DIR=/var/www/html/orgweb/styles
export TARGET_DIR=/var/www/html/orgweb/live-scripting

# test rsync
rsync -av --dry-run --delete $SOURCE_DIR $TARGET_DIR
rsync -av --delete $SOURCE_DIR $TARGET_DIR

ls -la $TARGET_DIR
find $TARGET_DIR/styles
rm -rf $TARGET_DIR/styles

find $WEB_ROOT -name "styles"
find $WEB_ROOT -name "styles" -exec rm -rf {} \;

## check resuclt
cd /var/www/html/orgweb/styles/
find /var/www/html/orgweb/ -type l -exec rm {} \;
find /var/www/html/orgweb/ -type l
find /var/www/html/orgweb/ -type d

## executing ln two times produes error
cd   /var/www/html/orgweb/aw-org-html-themes/demo
pwd  /var/www/html/orgweb/aw-org-html-themes/demo
ls -la
ln -s  ../../styles styles

mkdir -p  /var/www/html/orgweb/aw-org-html-themes/foobar
cd   /var/www/html/orgweb/aw-org-html-themes/foobar
ls -la
ln -s  ../../styles styles
Test URL: http://localhost/orgweb/sitemap.html
3.7 Automation of Publishing Process
This includes following steps:
- Publish to local website.
- Update lunr search index.
- Sync to public website on S3.
3.7.1 Publishing with script publish.sh
The first task involves running emacs in batch mode and executing org-publish.
Then I will use the awscli to sync the website to S3.
These steps will be implemented in the script ~/org/live-scripting/bin/publish.sh
 ### Publish to local website via script.
 ~/org/live-scripting/bin/publish.sh -c publish -L DEBUG
# If this call complains about a read lock, close emacs and start from a terminal.

### extending PATH in .profile
# extend path to include custom scripts
export PATH=~/org/live-scripting/bin:${PATH}

## The publish process can be started with:
publish.sh -c publish
3.7.2 Problem syntax highlighting is poor
The syntax highlighting for the bash source code blocks look poor when using the script publish.sh.
Analysis:
This is complicated. Puh.
This problem is discussed at https://emacs.stackexchange.com/questions/31439/how-to-get-colored-syntax-highlighting-of-code-blocks-in-asynchronous-org-mode-e
In short, the module responsible for formatting code snippets, htmlize, is configured differently in both situations.
Solution:
- Set variables in publish-config.el:
(setq org-export-with-broken-links t)
(setq org-html-htmlize-output-type 'css)
- Create syntax.css using "M-x org-html-htmlize-generate-css" in emacs.
- Edit the setup-file to load syntax.css
- Distribute syntax.css together with the other style sheet files.
The result can be observed in the following sequence of pictures.
The first one shows the publishing result from within emacs unsing M-x org-publish-project.
The second shows the result of publishing in emacs batch mode without modifications of this solution.
The third pictures shows the result of publishing in emacs batch mode with this solution applied.

Figure 8: Differences in syntax highlighting depending on publish method.
Ok. While this solutions solves the problem, more work could be done to fine tune the style sheets.
4 Adding Search to the web
An important aspect of documentation is finding the documented information. Once the web grows, full text search is needed. Lunr as a full text search engine is a good choice. It is based on java script and as it states on it's website: it shines like solr but not as bright.
Lunr Website
4.1 Lunr Integration
There is a Github project that indexes HTML pages with lunr and cheerio and makes them searchable with a search page.
Lunr-Index-and-Search-for-Static-Sites This project can be used as reference.
I temporarily clone the project to use some artefacts.
The following diagram helps to explain how everything works together.
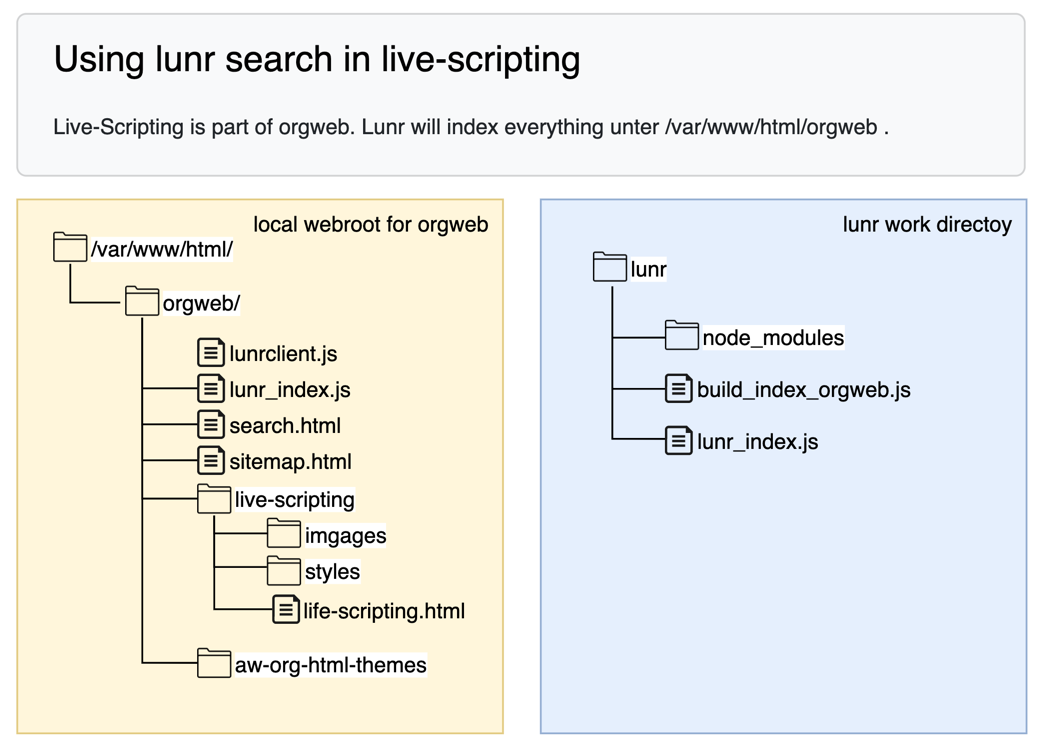
Figure 9: Directory Layout for Lunr Search in live-scripting
I use a lunr working director to generate the search index. Lunr and Cheerio must be installed here.
I use the file build_index.js from the github project, copy it to the working directory and rename it to buid_index_orgweb.js to reflect that it is modified for orgweb. I have to edit it to insert my web root. This javascript file uses cheerio to parse all html files under my web root and creates the index in a file lunr_index.js.
This has to be updates whenever the website is published.
At the web root I use the files runclient.js and search.html which I copy from the github project.
The following script block executes everything.
WORKDIR=~/lunr
WEBROOT=/var/www/html/orgweb
### create a project directory
mkdir -p $WORKDIR
cd $WORKDIR
ls -la
mkdir $WEBROOT/lunr
cd $WEBROOT/lunr
## Install npm
sudo apt install npm
## Install lunr
npm update node
npm install lunr
npm install cheerio

### create a temporary working directory
mkdir ~/lunr_work
cd ~/lunr_work
### clone the project with example site
git clone https://github.com/BLE-LTER/Lunr-Index-and-Search-for-Static-Sites.git
cd ~/lunr_work/Lunr-Index-and-Search-for-Static-Sites
### copy relevant files
cp build_index.js $WORKDIR/build_index_orgweb.js
cp example_site/search.css $WEBROOT/
cp example_site/search.html $WEBROOT/
cp example_site/lunrclient.js $WEBROOT/
### clean up  lunr_work
cd
rm -rf ~/lunr_work

### Edit costants in build_index_orgweb.js
cd $WORKDIR
ls -la
### build the index for the example site and copy to webroot
node build_index_orgweb.js
cp lunr_index.js $WEBROOT

### Check index
cd $WEBROOT
ls -la

### Take some artefacts under git control
LUNR_FILES=~/org/live-scripting/lunr_files
mkdir $LUNR_FILES
cp $WORKDIR/build_index_orgweb.js $LUNR_FILES
cp $WEBROOT/lunrclient.js $LUNR_FILES
cp $WEBROOT/search.html $LUNR_FILES

### check and git
cd $LUNR_FILES
ls -la
git status
### use magit to add and commit
Now the search page is available at: http://localhost/orgweb/search.html
And on S3 at: http://live-scripting.s3-website.eu-central-1.amazonaws.com/search.html
The index creation must be part of the publishing process.
I add it to the script publish.sh.
4.2 Creating an Index Page for the web
I want to have a central index page for orgweb, named index.html, which is located at the orgweb root.
This page includes the search field and the sitemap. I is created from the file index.org using org-publish.
## copy file to include in git
cp  ~/org/index.org ~/org/live-scripting/lunr_files/
cp  ~/org/index.org.template ~/org/live-scripting/lunr_files/
ls -la ~/org/live-scripting/lunr_files/

## commit and push with magit
4.2.1 Creating the search field
The Lunr integration uses the search.html file. I copy the content to my new index.org file using HTML export declarations.
I also need the content from the HTML head element. I can set these in the index.org using HTML_HEAD declarations.
The file index.org is located directly under ~/org which is outside any git project. Therefore a save a copy at ~/org/live-scripting/lunr_files/ and put it under git control. On any modification it has to be copied manually.
4.2.2 Creating the sitemap
A sitmap for orgweb is created during the org-publish process. It results in the file sitemap.html
I only need the body part form it.
I use perl to cut the relevant lines and paste them at the end of the index.org file.
The code is manually developed below.
cd ~/org
ls -la
cat /var/www/html/orgweb/sitemap.html
### Cut out relevant part of sitemap.html
### explanation of the chained command
cat /var/www/html/orgweb/sitemap.html | \
perl -ne 'print if /<body>/../<\/body>/' | \                 # Take only the body part
perl -ne 'print if /<div id=\"content\">/../<\/div>/' | \    # Take only the div blocks
perl -ne 'print if ! ( $. <= 2)' | \                         # Cut away the first two lines
perl -ne 'print if ! eof'                                    # Cut away the last line

### The chained command
cat /var/www/html/orgweb/sitemap.html  |\
perl -ne 'print if /<body>/../<\/body>/' |\
perl -ne 'print if /<div id=\"content\">/../<\/div>/' |\
perl -ne 'print if ! ( $. <= 2)' |\
perl -ne 'print if ! eof' > /tmp/sitemap.txt

cat /tmp/sitemap.txt

### Insert it into index.org

cat ~/org/index.org.template
cp ~/org/index.org.template ~/org/index.org
echo "#+BEGIN_EXPORT html" >> ~/org/index.org
cat /tmp/sitemap.txt  >> ~/org/index.org
echo "#+END_EXPORT" >> ~/org/index.org
cat  ~/org/index.org

# Publish for testing
publish.sh -c publish
This is added to publish.sh and thus automatically updated on every publish action.
This also includes extending publish-project.el to include a single publish task for index.org.
Since index.org is modified after the website is published, it has to be regenerated.
It is also implemented in publish.sh and works fine.
Ok.
4.2.3 Creating a Home Button
The orgmode HTML exporter defines the variables HTML_LINK_HOME and HTML_LINK_UP. I want to include a "Home-Link" on every HTML pages that links to the index.html of orgweb.
I need to use a root-relative URL because it must work in orgweb on localhost and on the S3 hosted site. Therefore it is necessary that the directory structures in both websites are identical.
#+HTML_LINK_HOME: /orgweb/index.html
#+HTML_LINK_UP: /orgweb/index.html
5 Sharing Options
It is not always possible or wanted to give access to the orgweb to everybody on the internet. There are multiple Options to share the whole org-web, single org-files or only parts of an org-file. The simplest form is an export to an ascii file which is quite readable but omits pictures and attachements. The most versatile form is a PDF file which features clickable links and inline integration of pictures. It is also possible to zip the whole orgweb or parts of it and send it to the recipient via file sharing. Furthermore there is an Markdown export options as well. All these possiblities produce quite good results out of the box.
5.1 ASCII Export
5.2 Markdown Export
5.3 HTML Archive
5.4 PDF Export
The whole orgfile or parts of it can be exported to PDF. This is done via the LaTeX exporter.
It's been quite a while since I worked with Latex the last time and I am surprised that it is still used and well supported in 2020. The export to Latex and PDF works flawless and the result is very usable. However, if you are not satisfied with the result, it gets complicated. There are endless ways to tailor the export process, but that requires deep knowledge of the exporter backend, Tex and Latex. Some configurations can be made via org mode directives and emacs variables. The org mode documentation describes in detail. It can be found here: https://orgmode.org/manual/LaTeX-Export.html.
If you need more flexibility, this tutorial on wrog is a good starting point to understand and modify the export process: https://orgmode.org/worg/org-tutorials/org-latex-export.html
To export an org mode file to pdf simply use this command.
M-x org-letex-export-to-pdf
The Latex Class can be controlled with org mode directive.
Choose the latex class: article, report, book.
, #+LATEX_CLASS: report
Here is an example PDF export of this live-scripting.org.
file:images/Sharing_Options/2020-08-21_13-07-08_live-scripting.pdf
5.5 Problem: PDF creation fails
I get the error message:
LaTeX Error: File `wrapfig.sty' not found.
Analysis:
This problem is discussed at: https://tex.stackexchange.com/questions/291531/exporting-org-files-to-latex-error
Solutions:
I could solve the problem by installing texlive and extra packages.
sudo su
#password
apt-get update
apt-get install texlive
apt-get install texlive-latex-extra
This installs the versions:
# texlive newest version (2019.20190710-1).
# texlive-latex-extra newest version (2019.20190710-1).
And this solves the problem.
6 Miscellaneous
6.1 Handling large images
Large images can be resized during inline displays and in export to html and PDF.
We can use modifier attributes for it.
In the HTML page, the resized image should open to it's full size by clicking it. This can be achieved by including a html link as the description part in org-link.
I added the elisp function org-download-link-format-function-aw in the file publish-project.el.
By customizing the variable org-download-link-format-function.
The function is a modified version of the default function with alters the format of the image link.
Here is an example. A large screenshot is included but with specified width values.
#+caption: Screenshot that shows the modifications for clickable image links.
#+Attr_html: :width 200px
#+Attr_org: :width 200px
The resulting small picture in the html file is clickable and opens the picture file in full size.
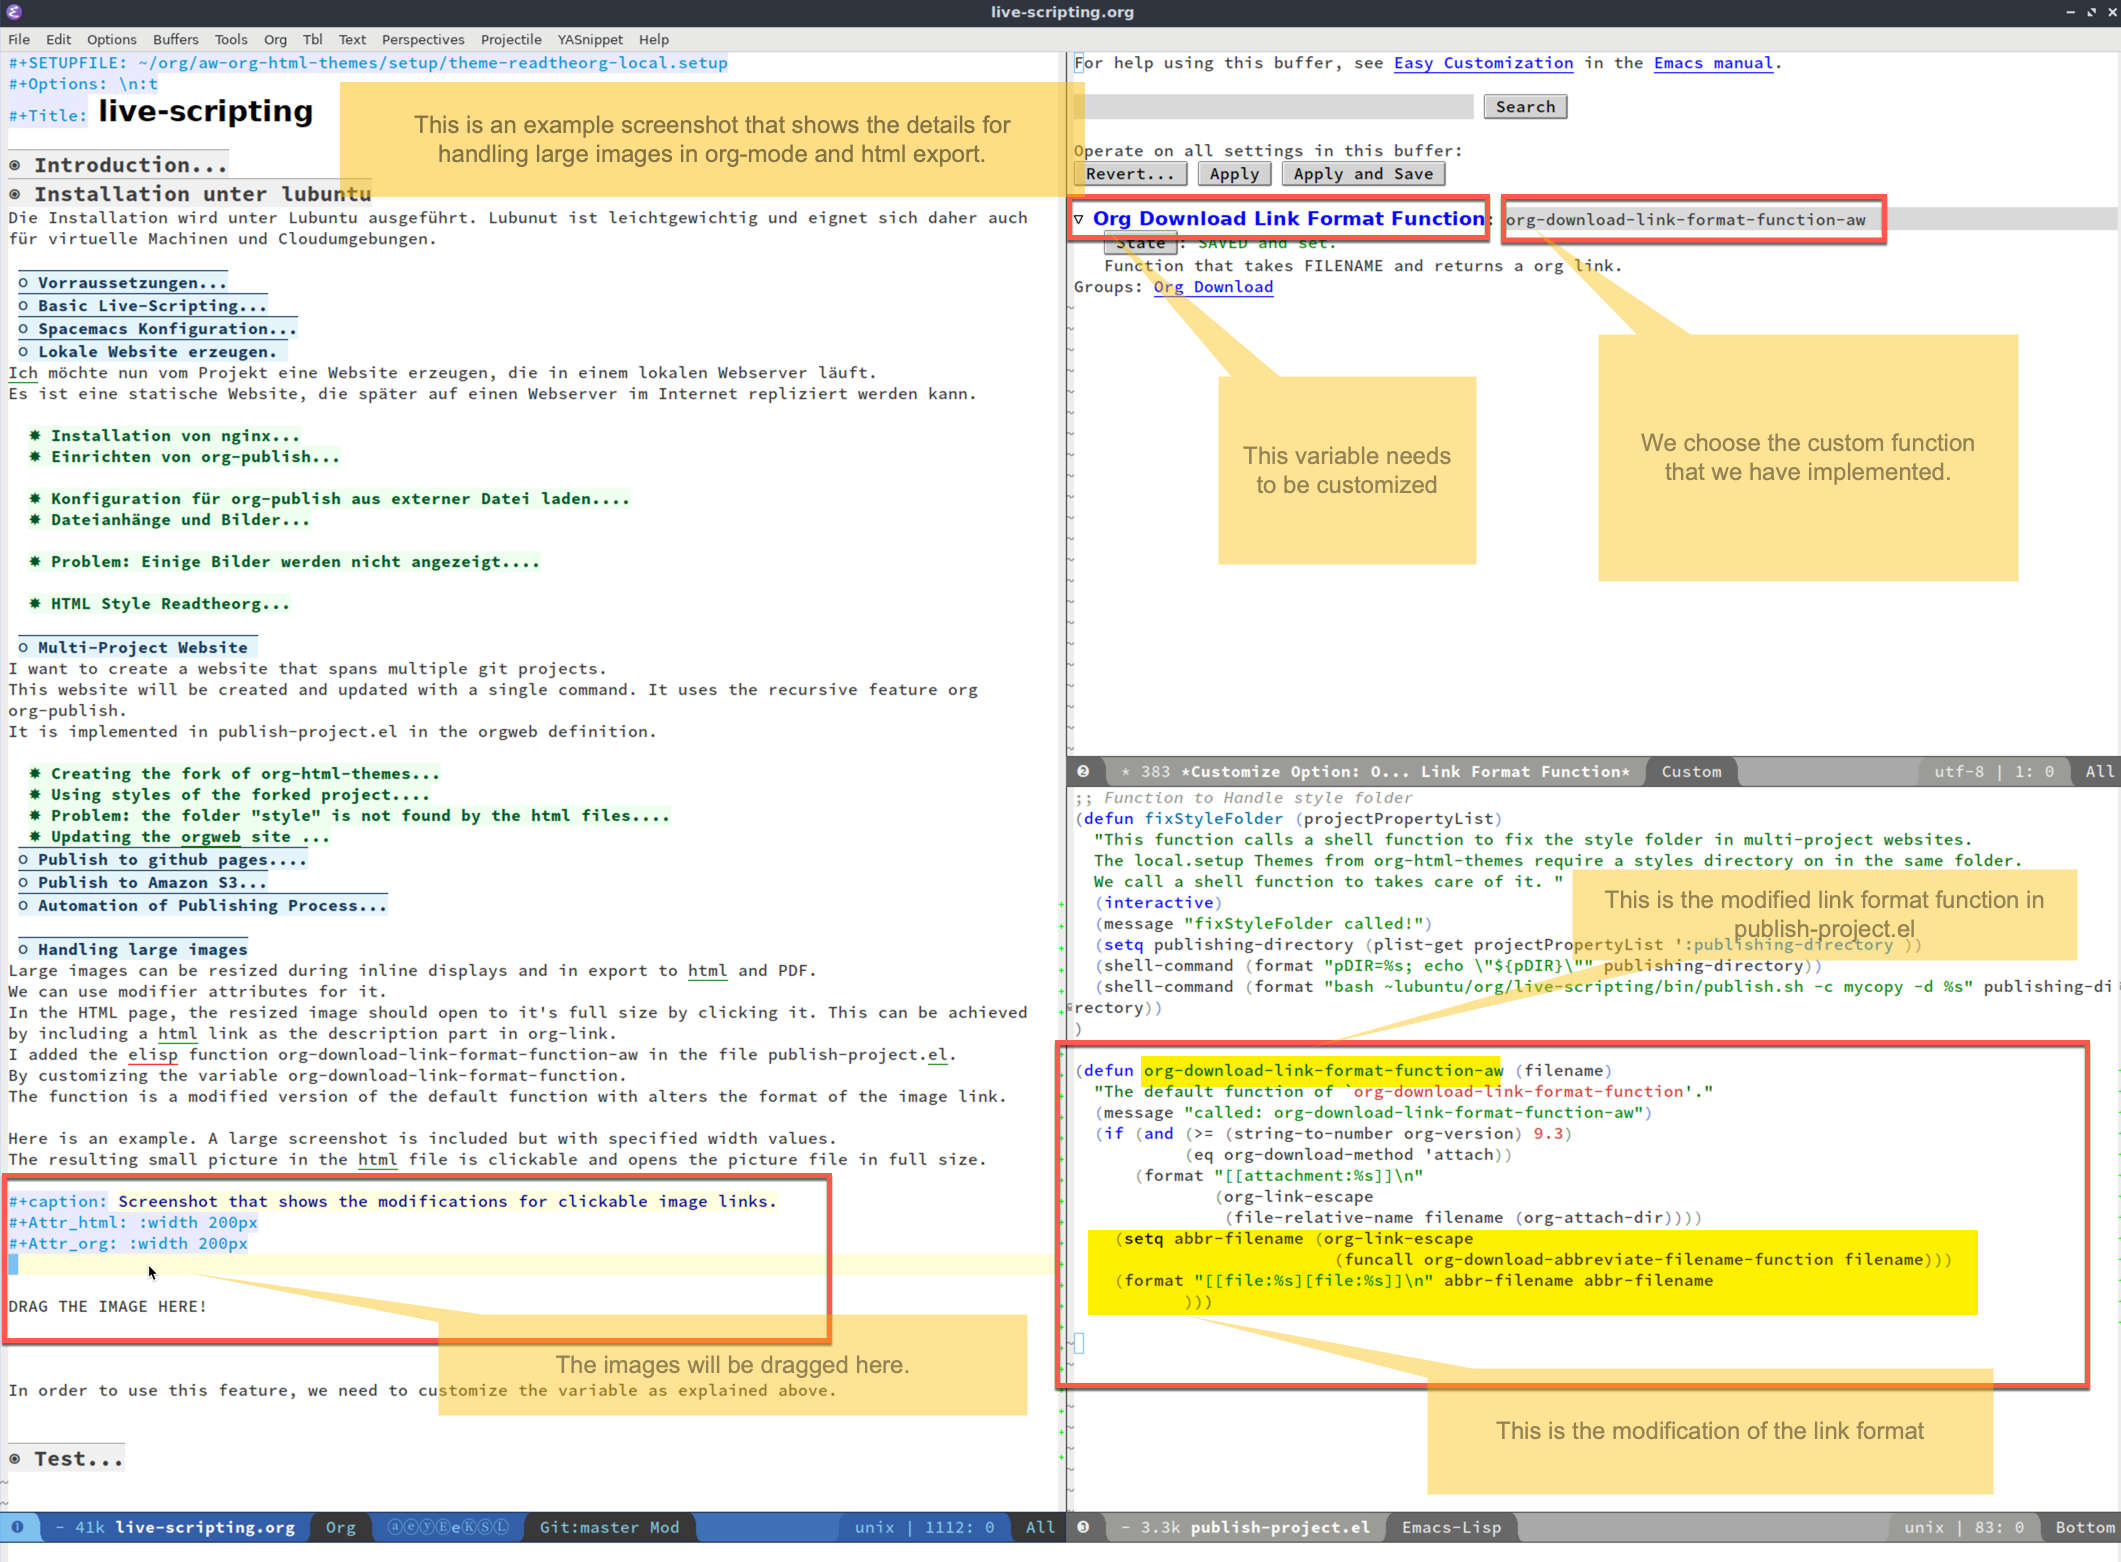
Figure 10: Screenshot that shows the modifications for clickable image links.
In order to use this feature, we need to customize the variable as explained above.
6.2 Side by Side images using a table.
It is possible to place images side by side, using an orgmode table.
However orgmode tables don't support multi-line cells. Thus it is not possible to enrich it with caption or attributes.
 |
 |
| Apple | Banana |
6.3 Displaying folder structures
Folder Structures can be created with the unix tree command.
It can be presented in a source block.
lubuntu@lubuntu-pc:/var/www/html/orgweb/live-scripting/images$ tree
.
├── Installation_unter_lubuntu
│   ├── 2020-06-24_11-15-55_orgcard.pdf
│   ├── 2020-06-24_11-21-33_banana.jpeg
│   ├── 2020-06-30_10-25-57_2020-06-21_17-34-52_2020-06-21_17-15-37.png
│   ├── 2020-06-30_10-26-47_2020-06-21_17-34-52_2020-06-21_17-15-37.png
│   ├── 2020-07-03_21-03-36_2020-07-03_21-01-27.png
│   └── 2020-07-07_21-36-29_2020-07-07_21-31-11.png
├── Introduction
│   └── 2020-07-03_22-06-50_2020-07-03_22-05-56.png
└── Test
    ├── 2020-07-08_08-52-47_1565435.png
    ├── 2020-07-08_08-53-30_banana.jpeg
    └── 2020-07-08_08-54-39_banana.jpeg
6.4 Handling Sub and Superscript
Orgmode uses the underscore letter to indicate superscript. Most of the time this is not what I want.
The Variable org-use-sub-superscript can be used to customize this behavior.
I choose the option "only with braces" to enable special format when I want it. Unfortunately this setting is ignored during the publishing process. As an alternative I use the directive:
#+OPTIONS: ^:{}
;;possible values are t, nil, {}
This will not be_subscript
This will be_{subscript}
This will not be^superscript
This will be^{superscript}
These lines produce the following result:
This will not be_subscript
This will besubscript
This will not be^superscript
This will besuperscript
Ok.